
Form Connector – QuickBooks
 | QuickBooks is only available under the Premium FormsFly subscription plan. |
After adding and authenticating a QuickBooks Connection, QuickBooks Form Connectors can be added to Data Entry Forms to push data when a form is uploaded, as this article explains.
In this article:
Adding the Connector
Follow these steps to add the connector to your specific form:
- Navigate to Forms > Create/Edit Forms.
- Hover over your desired form and click the Connect icon.
- Click the Add Connector button (top-right).
- Select QuickBooks from the options.
Note: The page will refresh with the connector added. Changes are not live until you click Save.
Quick Access Tip
If you are already inside the Form Builder or Settings view, you don’t need to go back to the main menu. Simply click the Connectors tab located directly under the form title at the top of the screen.
Configuring the Connector
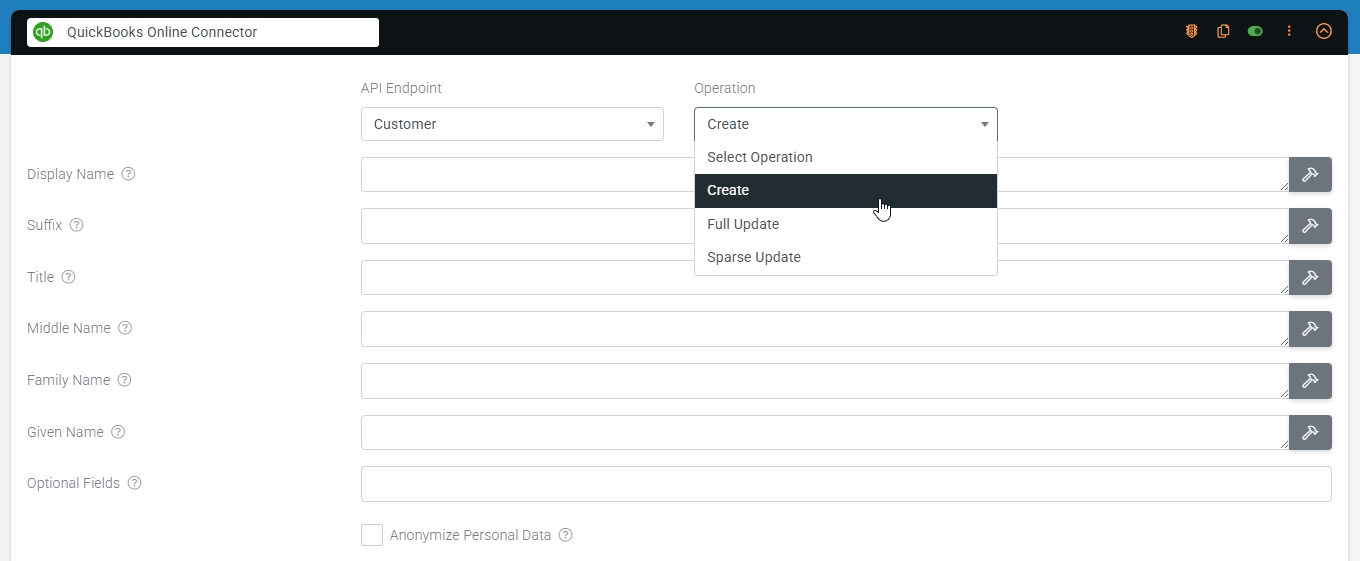
After adding the form connector, an API Endpoint and Operation must be selected.
Depending on the selections, various properties become available to create or update data in QuickBooks with form-captured data by referencing field data names or using a formula.
API Endpoints & Operations
| API Endpoints | Operations |
| Class Customer Invoice Time Activity | Create Full Update Sparse Update |
Class – Create or update
Depending on the operation, all or some of the following properties will be available. Some might require identifiers (IDs) from your QuickBooks account to push data successfully.
| Property | Description |
| Id | Unique identifier for this object. |
| Sync Token | If enabled, data from fields marked as Personal Data will be converted to a non-human-readable format to aid privacy. |
| Name | User recognizable name for the Class. max character: maximum of 100 chars |
| Parent Reference | A reference to a Customer object that is the immediate parent of the Sub-Customer/Job in the hierarchical Customer: Job list. Required for the create operation if this object is a sub-customer or Job. Use Customer.Id and Customer.DisplayName from that object for ParentRef.value and ParentRef.name, respectively |
| Optional Fields | Optional fields that let you push and pull specific data with QuickBooks Online. |
| Anonymise Personal Data | If enabled, data from fields marked as Personal Data will be converted to a nonhuman-readable format to aid privacy. |
Customer – Create or update
Depending on the operation, all or some of the following properties will be available. Some might require identifiers (IDs) from your QuickBooks account to push data successfully.
| Property | Description |
| Id | Unique identifier for this object. |
| Sync Token | Version number of the object. Attempts to modify an object specifying an older SyncToken fails. Only the latest version of the object is maintained by QuickBooks Online. |
| Display Name | The name of the person or organization is displayed. Must be unique across all Customer, Vendor, and Employee objects. Cannot be removed with sparse update. If not supplied, the system generates DisplayName by concatenating customer name components supplied in the request from the following list: |
| Suffix | Suffix of the name. For example, Jr. The DisplayName attribute or at least one of Title, GivenName, MiddleName, FamilyName, or Suffix attributes is required. |
| Title | Title of the person. This tag supports i18n, all locales. The DisplayName attribute or at least one of Title, GivenName, MiddleName, FamilyName, or Suffix attributes is required. |
| Middle Name | Middle name of the person. The person can have zero or more middle names. The DisplayName attribute or at least one of Title, GivenName, MiddleName, FamilyName, or Suffix attributes is required. |
| Family Name | Family name or the last name of the person. The DisplayName attribute or at least one of Title, GivenName, MiddleName, FamilyName, or Suffix attributes are required. |
| Given Name | Given name or first name of a person. The DisplayName attribute or at least one of Title, GivenName, MiddleName, FamilyName, or Suffix attributes is required. |
| Optional Fields | Optional fields that let you push and pull specific data with QuickBooks Online. |
| Anonymise Personal Data | If enabled, data from fields marked as Personal Data will be converted to a non-human-readable format to aid privacy. |
Invoice – Create or update
Depending on the operation, all or some of the following properties will be available. Some might require identifiers (IDs) from your QuickBooks account to push data successfully.
| Property | Description |
| Id | Unique identifier for this object |
| Sync Token | Version number of the object. Attempts to modify an object specifying an older SyncToken fails. Only the latest version of the object is maintained by QuickBooks Online. |
| Line | Individual line items of a transaction. Valid Line types include SalesItemLine, GroupLine, DescriptionOnlyLine (also used for inline Subtotal lines), DiscountLine, and SubTotalLine (used for the overall transaction). If the transaction is taxable, there is a limit of 750 lines per transaction. For more information, Visit QuickBooks Invoice Docs |
| Customer Reference | Reference to a customer or job. Query the Customer name list resource to determine the appropriate Customer object for this reference. Use Customer.Id and Customer.DisplayName from that object for CustomerRef.value and CustomerRef.name, respectively. |
| Detail Type | Valid values for DetailType are: SalesItemLineDetail, GroupLineDetail and DescriptionOnly |
| SalesItemLineDetail Qty | Number of items for the line. Relevant for SalesItemLineDetail |
| SalesItemLineDetail UnitPrice | Unit price of the subject item as referenced by ItemRef. Corresponds to the Rate column on the QuickBooks Online UI to specify either unit price, a discount, or a tax rate for an item. If used for unit price, the monetary value of the service or product, as expressed in the home currency. You can override the unit price of the subject item by supplying a new value with create or update operations. If used for a discount or tax rate, express the percentage as a fraction. For example, specify 0.4 for 40% tax. Relevant for SalesItemLineDetail |
| SalesItemLineDetail TaxInclusiveAmt | The total amount of the line item, including tax. Constraints: Available when endpoint is evoked with the minorversion=1query parameter. |
| SalesItemLineDetail ServiceDate | Date when the service is performed. |
| SalesItemLineDetail DiscountAmt | The discount amount applied to this line. If both DiscountAmt and DiscountRate are supplied, DiscountRate takes precedence, and DiscountAmt is recalculated by QuickBooks services based on the amount of DiscountRate. |
| SalesItemLineDetail DiscountRate | The discount amount applied to this line. If both DiscountAmt and DiscountRate are supplied, DiscountRate takes precedence and DiscountAmt is recalculated by QuickBooks services based on the amount of DiscountRate. |
| SalesItemLineDetail MarkupInfo PriceLevelRef | Reference to a PriceLevel for the markup. Support for this element will be available in the coming months. |
| SalesItemLineDetail MarkUpIncomeAccountRef | The account associated with the markup. Available with invoice objects, only, and when linktxn specified a ReimburseCharge. |
| SalesItemLine Detail ItemRef | Reference to an Item object. Set ItemRef.value to SHIPPING_ITEM_ID when Line.amount represents transaction-wide shipping charges. Valid when the following is set to true: Set ItemRef.value to GRATUITY_ITEM_ID when Line.amount represents transaction-wide gratuity amount. Valid when the following is set to true: When a line lacks an ItemRef it is treated as documentation and the Line.Amountattribute is ignored. Applicable to invoice objects, only, and when linktxn specifies a ReimburseCharge. When Item.Id is set to 1, ItemAccountRef refers to reimburse expense account Id. For France locales: The account associated with the referenced Item object is looked up in the account category list. If this account has same location as specified in the transaction by the TransactionLocationType attribute and the same VAT as in the line item TaxCodeRef attribute, then the item account is used. If there is a mismatch, then the account from the account category list that matches the transaction location and VAT is used. If this account is not present in the account category list, then a new account is created with the new location, new VAT code, and all other attributes as in the default account. Relevant for SalesItemLineDetail |
| DescriptionLine Detail ServiceDate | Date when the service is performed. Relevant for DescriptionLineDetail |
| DescriptionLine Detail TaxCodeRef | Reference to the TaxCodefor this item. Query the TaxCode name list resource to determine the appropriate TaxCode object for this reference. Use TaxCode.Id and TaxCode.Name from that object for TaxCodeRef.value and TaxCodeRef.name, respectively. Relevant for DescriptionLineDetail |
| Optional Fields | Optional fields that let you push and pull specific data with QuickBooks Online. |
| Anonymise Personal Data | If enabled, data from fields marked as Personal Data will be converted to a nonhuman-readable format to aid privacy. |
Multiple Invoice Lines
To add multiple lines to an invoice, use a repeating page or table field in your form.
Each row represents a separate line item and can include fields such as Description, Quantity, Unit Amount, ItemCode, Account Code, Tax Type, Tax Amount, Line Amount and Discount Rate.
Mapping these repeating fields ensures that all lines are sent correctly to QuickBooks in a single invoice.
Time Activity – Create or update
Depending on the operation, all or some of the following properties will be available. Some might require identifiers (IDs) from your QuickBooks account to push data successfully.
| Property | Description |
| Id | Unique identifier for this object. |
| Sync Token | Version number of the object. Attempts to modify an object specifying an older SyncToken fails. Only the latest version of the object is maintained by QuickBooks Online. |
| NameOf | Enumeration of time activity types. Required in conjunction with either EmployeeRefor VendorRefattributes for create operations. Valid values: Vendoror Employee. |
| Txn Date | The date entered by the user when this transaction occurred. yyyy/MM/dd is the valid date format. For posting transactions, this is the posting date that affects the financial statements. If the date is not supplied, the current date on the server is used. Sort order is ASC by default. |
| Hours | Hours and minutes worked. Required if StartTime and EndTime not specified |
| Start Time | Time that work starts and ends, respectively. Required if Hours and Minutes not specified. Note: Kindly consider only the Hours without including the timeZone offset as it does not impact time activity hours calculation |
| End Time | Time that work starts and ends, respectively. Required if Hours and Minutes not specified. Note: Kindly consider only the Hours without including the timeZone offset as it does not impact time activity hours calculation. |
| Hourly Rate | Hourly bill rate of the employee or vendor for this time activity. Required if BillableStatus is set to Billable |
| Vendor Reference | Specifies the vendor whose time is being recorded. Query the Vendor name list resource to determine the appropriate Vendor object for this reference. Use Vendor.Id and Vendor.Name from that object for VendorRef.value and VendorRef.name, respectively. Required if NameOf is set to Vendor |
| Employee Reference | Specifies the employee whose time is being recorded. Required if NameOf is set to Employee |
| Project Ref | Reference to the Project ID associated with this transaction. Available with Minor Version 69 and above |
| Optional Fields | Optional fields that let you push and pull specific data with QuickBooks Online. |
| Anonymise Personal Data | If enabled, data from fields marked as Personal Data will be converted to a non-human-readable format to aid privacy. |
 | Anonymise Data If this option is enabled, form answers marked as Personal Data will be excluded. |
Adding a Run Condition
Sometimes, you may have a connector you only want to fire if the Form entry has a given answer value.
You can achieve this by selecting Add Run Condition at the top right of the connector to display the Only Perform This Action When property. This property allows for a formula that returns a true or false result, determining whether or not the connector is triggered, i.e., whether an email is sent.
Learn more about Creating a Formula.
Furthermore, if you only need this connector to trigger due to a specific condition based on form-captured data, be sure to add a Run Condition. When a formula entered returns a true result on upload, it will trigger the Connector as opposed to every upload.
| Property | Description |
| Only Perform This Action When | Add a formula with a true/false result that calculates whether or not this Connector should run when a form entry is submitted. {{dataname}} = ‘High’ |
| Wait No Longer Than | Specify a maximum time to wait before running this Connector. Generally, the answer values on Form entries are uploaded within a few seconds. If photos or other media are captured, these files can take time to upload. By default, the system waits until all media files are uploaded from the app before running the Connector. Use this option to force the sending of outputs (likely missing some photos) due to business-critical timeframes. |
Once you’re done configuring, hit Save at the top right. This will enable the Connector to push data to your QuickBooks account when forms are submitted.
Cloning a Connector
Suppose you want multiple outputs sent out on a form upload, which share many of the same properties (email body, recipients, etc.). In that case, you can click Clone to duplicate the connector and its settings, and then reconfigure accordingly (data template, run condition, etc.).