
Exporting Form Data Manually
In this article
There are two ways to do this, depending on your needs: Single Entry Export (for detailed, templated PDFs/Docs) and Bulk Export (for raw data or mass document generation).Exporting a Single Entry
Exporting a Single Entry
Use the Feed View when you need to export a specific record using a custom layout or a Generic PDF.
How to Export
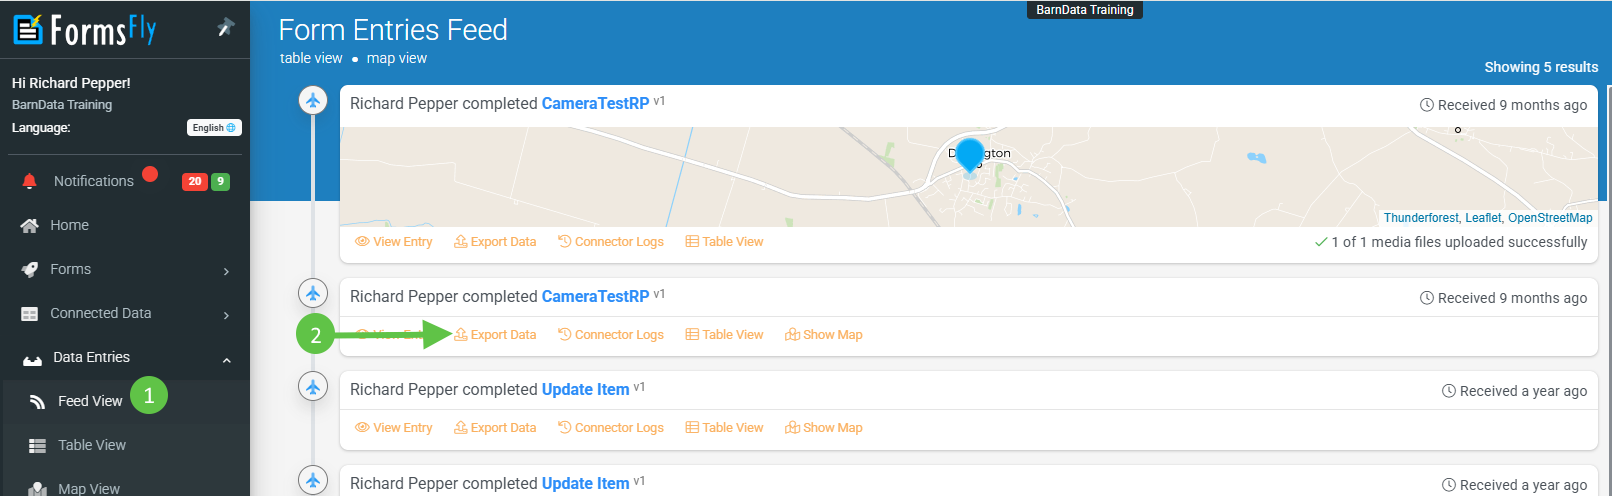
- Navigate to Data Entries > Feed View.
- Locate the specific record (use filters if necessary).
- Click Export Data to open the options drawer.
Configuration Options
| Option | Description |
| Export As | Choose between the Generic PDF or a custom Word/Excel template. |
| Export as PDF | If using a Word/Excel template, toggle this to convert the final output to PDF. |
| Clickable Images | Makes images in the file clickable links. Note: Links will show the platform’s domain. |
| High-Resolution | Increases resolution from 96ppi to 150ppi. Best for printing, but results in larger files. |
| Anonymize Data | Masks fields marked as “Personal Data” in the Form Designer for privacy. |
| Disable Timestamp/Code | Prevents the system from adding 'yyyyMMdd' or random strings to your filename. |
| Show Errors | Diagnostic Tool: Highlights formula syntax errors within your template. |

Once you click Export, wait for the notification pop-up to download your file. If you miss it, you can always find your file under the Notifications tab in the side menu.
Exporting Multiple Entries (Bulk)
Use the Table View to export large datasets for analysis or to generate documents for multiple entries at once.
How to Export2
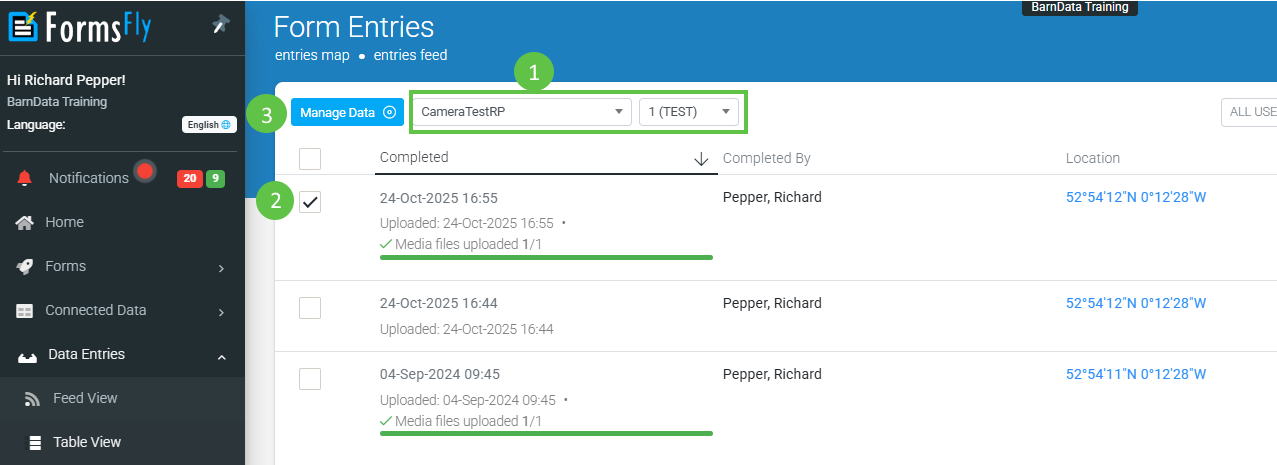
- Navigate to Data Entries > Table View.
- Select your Form and Form Version from the dropdowns.
- Check the boxes for the individual records you need, or select all.
- Click the Manage Data button.
Available Formats
- CSV / CSV + Media: Best for data analysis in Excel or Google Sheets. The “Media” option includes a ZIP of all uploaded photos/files.
- Bulk PDF: Generates a PDF for every selected record using the Generic or custom template.
- Bulk MS Word / Excel: Only available if a template is already attached to the Form.
- Trash: Moves all selected records to the account Trash.
Privacy & Formatting
- Anonymize Data: Redacts “Personal Data” fields across all selected records.
- Clickable Images: Enables web browsers to view images embedded in bulk files.

File Naming Convention for Bulk Exports
When performing a Bulk CSV + Media export, media files are automatically renamed to ensure they map correctly to your data. Each filename is prefixed with the EntryRowID, which corresponds to the value in the first column of your generated CSV.
Filename Format: {EntryRowID} - {EntryId}{Filename}.{ext}
 | Using the EntryRowID as a prefix allows you to easily cross-reference and sort your media files alongside your spreadsheet data. |
For information about automated export methods (i.e., e-mail or numerous other options), visit the Form Connectors section.