
Email - Form Connector
Examples of use could be, if a building inspection is performed, you need to email a ‘Certificate of Inspection’ to the building owner.
Or, if you are taking a product order from a customer, you might want to send them an order docket or invoice automatically.
In this article
With our powerful Data Template functionality, customize the output of your Form entry as desired. This lets you create Word or Excel templates that are injected with Form answers to generate custom outputs based on existing documents you’re currently using.
Adding a Connector
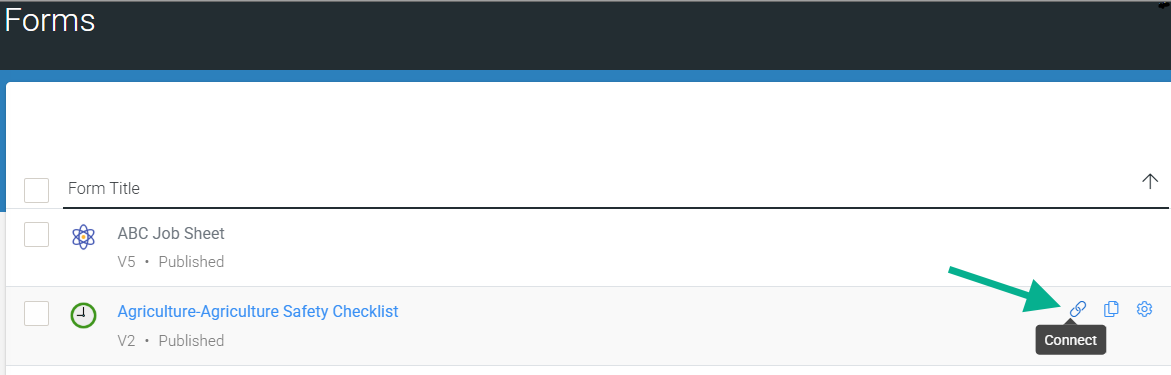
Add a Form Connector by navigating to your Screens page to view all screens created.
Then, click the link icon on the desired form to view its Connectors page, or if you’re on a form’s settings/design page, click the Connectors option under the page title
Once you’re on the Connectors page, click the Add Connector button (top right corner) to see a list of available Connectors and select the Email option.
This will refresh the page and display your Email Connector, which is ready for configuration.
| At this stage, nothing has been saved. Hit Save on the top right corner to save your Connector after configurating. |
Email Settings
Email configuration options are available to send form-captured data in customisable file formats to intended recipients.
File Format
| Email Data as | Select the File Format you wish for the user’s form answers to be returned after completing the form.
|
| NOTE: If the "Anonymize Personal Data" option is enabled, form answers marked as Personal Data will be excluded. |
Email Addresses

The email that is triggered on form submission will be sent to a combination of the email addresses defined in ‘To Addresses’, ‘To Form Field Value’, and/or ‘To Submitting User’. At least one of these properties needs to be set.
| To Address(es) | Enter a single email address or a list of addresses to define the ‘To’ addresses for the email. Use commas or semicolons to separate the addresses. |
| To Form Field Value | Send emails to dynamic email address(es) by selecting a form field from the list. The user will define the required email address in the selected form field when completing the Form entry. |
| To Submitting User | If checked, an email will be sent to the App user who submitted the Form entry. |
| Email Sent From | When the email is forwarded on ‘Submit’ of this form, the Sender’s email address and the displayed name will be one of the addresses selected from the dropdown.
|
Body & Attachments
By default, the system will generate a subject, body, and attachment file name for the email it sends.
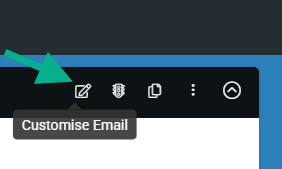
If you’d like to personalize the email sent, you can add static or dynamic text/data captured in the form to be displayed in the email’s subject, body, and attachment file name. Then, click Customise Email to display additional options allowing you to do so and more.
| Subject (Customize Email) | Enter a custom email subject of your choice. Create a dynamic subject using fields from your Form – hit the hammer icon to build your text. |
| Body (Customize Email) | Enter a custom email body of your choice. Create a dynamic body using fields from your Form – hit the hammer icon to build your text. HTML can also be used if you want that extra custom feel. To iterate through repeatable data in your email’s body, you can use HTML, as shown in the example below: <h1>o}xoxtext}}</h1> <table> o}xox!REPEATSTART}} <tr> <td>o}xoxtextTable1}}</td> <td>o}xoxtextTable2}}</td> </tr> o}xox!REPEATEND}} </table> NOTE: A limit of 4000 characters applies. |
| Attachment Name (Customize Email) | Enter a custom email attachment file name of your choice. You can also create a dynamic attachment name using fields from your Form – hit the hammer icon to build it. If you specify a custom file extension that is a valid MIME type, it will export the attachment as the type specified. Otherwise, the file extension (.pdf, .xlsx, .docx) will automatically be added to your name. |
| Disable Random Code (Customize Email) | Disable the default system behavior of appending a 6-character random code to the attachment file name. For example, instead of ‘FileName-abc123.pdf’, the file would be generated as ‘FileName.pdf’. |
| Send Media Files Separately | If this is checked, you can select the individual media files to send/attach. These could be signature images, photos, or other attachments.
|
| Embed Entry Identifier | By default, the system will not attempt to make media file names unique across form entries. In most cases, this is no problem; however, if multiple entries upload to the same storage location/folder, files of the same name (but from different entries) may overwrite each other. This option adds each submission’s unique identifier as a prefix or suffix to media file names, thereby ensuring uniqueness across entries. |
| Anonymize Personal Data | If enabled, data from fields marked as Personal Data will be converted to a non-human-readable format to aid privacy. |
At this stage, your connector is ready to go. To save your changes and activate the Connector, hit Save at the top right.
Adding a Data Template
With our powerful Data Template functionality, customize the output of your Form entry as desired. This lets you create Word or Excel templates that are injected with Form answers to generate custom outputs based on existing documents you’re currently using.

On the Connector, click the Add Data Template option at the top right. This will make the Format Data With Template property available for uploading a custom Word, Excel, or Text file.
Once uploaded, Save in the top right corner.
Now, when a user uploads a form, the form-captured data output will be customized in the template’s layout and styling.
Supported Template file types:
Learn all about templates in the Outputting Data with Templates area.
| Data Templates are uploaded specifically to the chosen Connector, so you can have multiple Connectors of the same type that output different files. For example, you may send a PDF "Certificate of Inspection" to a building owner in one Email Connector and send an Excel "Inspection Log" to your internal department address on a separate Email Connector with their own unique output format. |
Adding a Run Condition
Sometimes, you may have a Connector you only want to fire if the Form entry has a given answer value.

This is achieved by clicking the option Add Run Condition displaying the property Only Perform This Action When, which allows the formula to be entered in that returns a true or false result determining whether or not the connector is triggered, i.e., email sent or not.,
Clicking the Hammer icon on the right of the property will take you to the Formula Builder, which helps you put together the formula you desire.
See the Creating a Formula page to learn more about form formulae.
| Only Perform This Action When | Add a formula that calculates whether or not this Connector should be run when a form entry is submitted. Use the hammer icon to launch the Formula Builder and build a formula with a true/false result. |
| Wait No Longer Than | Specify a maximum time to wait before running this Connector. Generally, the answer values on Form entries are uploaded within a few seconds. If photos or other media are captured, these files can take time to upload. By default, the system waits until all media files are uploaded from the app before running the Connector. Use this option to force the sending of outputs (likely missing some photos) due to business-critical timeframes. |
| Run After Connector (displays if multiple connectors are added) | Creates a dependency for this connector’s execution based on the outcome of the selected connector. For example, if you select Success, this connector will only run if the selected connector’s outcome is successful. |
Once a Run Condition formula has been added, be sure to hit Save in the top right corner.
Cloning a Connector
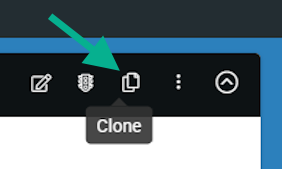
If you want multiple outputs sent out on a form upload and these outputs share many of the same properties (email body, recipients, etc.), you can click the option Clone to duplicate the connector with your current settings and then reconfigure accordingly (data template, run condition, etc.).