
Form Connector – Amazon S3 Storage
The platform lets you quickly and easily connect your Form Entries to Amazon S3.
This enables you to select which files, images, and videos to upload to Amazon S3 when forms are submitted.
Before you add an Amazon S3 Storage Connector, you must ensure that you have valid Amazon Web Services set up for your organization.
Adding the Connector
Follow these steps to add the connector to your specific form:
- Navigate to Forms > Create/Edit Forms.
- Hover over your desired form and click the Connect icon.
- Click the Add Connector button (top-right).
- Select Amazon S3 Storage from the options.
Note: The page will refresh with the connector added. Changes are not live until you click Save.
Quick Access Tip
If you are already inside the Form Builder or Settings view, you don’t need to go back to the main menu. Simply click the Connectors tab located directly under the form title at the top of the screen.
Configuring the Connector
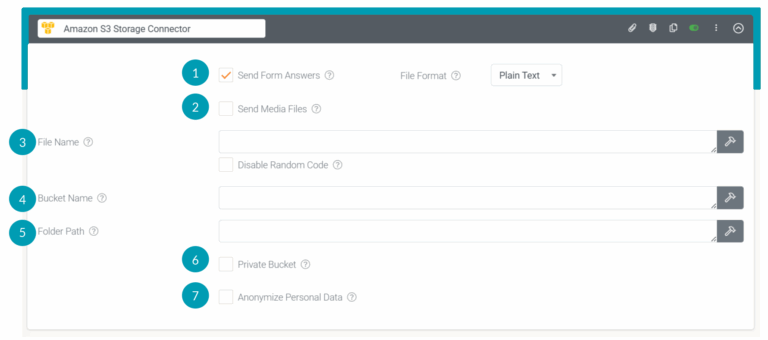
1. Send Form Answers
You can choose the format in which you want your Form entry data to be sent
| File Format | Description |
| CSV | Send form data in a .csv attachment. Customizable using a Text file template. |
| JSON | Send form data in a .json attachment Customizable using a Text file template. |
| Excel | Send form data in an .xlsx attachment. Customizable using an Excel template. |
| Word | Send form data as a .docx attachment. Customizable using a Word (.docx) template. |
| Send form data as a .pdf attachment. Customizable using a Word or Excel template or a built-in template. | |
| Plain Text | Send form data as plain text. By default, each field answered is placed on a new line. Customizable using HTML or our Data Template Syntax. |
| XML | Send form data as an .xml attachment. Customizable using a Text file template. |
2. Send Media Files
If this is checked, you will be able to select the individual media files to send/attach. These could be signature images, photos, or other attachments.
 | Anonymise Personal Data If this option is enabled, media files marked as Personal Data will be excluded. |
3. File Name
Optionally enter a custom file name of your choice.
You can also create a dynamic attachment name using fields from your Form – hit the hammer icon to build it.
The file extension (.pdf, .xlsx, .docx, etc.) will automatically be added to your name.
4. Bucket Name
Enter the name of the Bucket you wish to store the file in.
Before you can upload data into Amazon S3, you must create a Bucket to store the data in. Bucket names are globally unique and must be DNS-compatible.
5. Folder Path
Enter the folder path under your Bucket that you wish to organize your file within:
| ‘Bucketname/FolderName/FileGoesInThisOne’ |
6. Private Bucket
Enable this option if your AWS S3 Bucket is listed as private and has special ACL settings.
7. Anonymize Personal Data
If enabled, data from fields marked as Personal Data will be converted to a non-human-readable format to aid privacy.