
Form Connector – Google Drive
In this article:
Adding the Connector
Follow these steps to add the connector to your specific form:
- Navigate to Forms > Create/Edit Forms.
- Hover over your desired form and click the Connect icon.
- Click the Add Connector button (top-right).
- Select Google Drive from the options.
Note: The page will refresh with the connector added. Changes are not live until you click Save.
Quick Access Tip
If you are already inside the Form Builder or Settings view, you don’t need to go back to the main menu. Simply click the Connectors tab located directly under the form title at the top of the screen.
Configuring the Connector
After adding the form connector, configure the connector. Configure the connector as shown below:
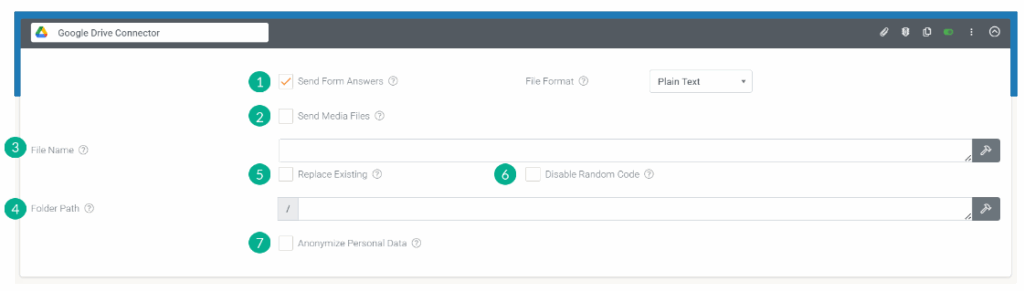
1. Send Form Answers
You can choose what format you want your Form entry data to be sent as:
| File Format | Description |
| CSV | Send form data in a .csv attachment. Customizable using a Text file template. |
| JSON | Send form data in a .json attachment Customizable using a Text file template. |
| Excel | Send form data in an .xlsx attachment. Customizable using an Excel template. |
| Word | Send form data as a .docx attachment. Customizable using a Word (.docx) template. |
| Send form data as a .pdf attachment. Customizable using a Word or Excel template or a built-in template. | |
| Plain Text | Send form data as plain text. By default, each field answered is placed on a new line. Customizable using HTML or the Data Template Syntax. |
| XML | Send form data as an .xml attachment. Customizable using a Text file template. |
2. Send Media Files
Allows you to attach the individual media files to be included in the email.
With this option enabled, the Connector will send/attach all media captured in the Form entry (photos, videos, etc.) as separate files. This is in addition to any generated answer/template output of the connector.
 | Anonymize Data If the Anonymize Personal Data option is enabled, media files marked as Personal Data will be excluded. |
3. File Name
Allows you to specify the names of the media files to be uploaded.
4. Folder Path
Enter the folder path under your Bucket that you wish to organize your file within: ‘Bucketname/FolderName/FileGoesInThisOne’
5. Replace Existing
By default, any existing files with the same name as those generated by this Connector will be overwritten. If this box is unchecked, new files will always be created, regardless of whether existing files of the same name exist.
6. Disable Random Code
Disable the default system behaviour of appending a 6-character random code to the generated file name.
e.g., instead of ‘FileName-abc123.pdf’, the file would be generated as ‘FileName.pdf’
7. Anonymize Personal Data
If enabled, data from fields marked as Personal Data will be converted to a non-human-readable format to aid privacy.
More information on run conditions may be of interest to you.