
Creating and Updating Rows in a Data Source
Note the following functionality only works with existing data sources. Hence, you must create the data source before creating any data entry forms to create, update, or delete rows from a data source.
This is key as Choices fields or Hidden Data Source fields need to be linked to the existing data source, and additional fields could be required or optionally bound to columns in the data source to display a row's column data.
In this article
- Creating or Updating a Row (New Screen)
- Creating or Updating a Row (Existing Screen)
- Deleting a Row (Single)
- Creating or Updating Rows (Multiple)
- Tips & Tricks
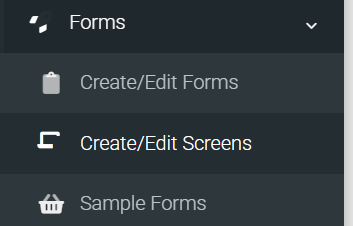
NOTE: The way new forms are created has recently been updated on the platform. There are now two menu options, depending on whether you wish to create a data entry form, or one of the other types (e.g. 'Board of icons'), which are now termed 'Screens'.
 |
Creating or Updating a Row (New Screen)
When you're looking to create a new Data Entry Form that can create or update a row in a data source, the simplest way to achieve this is to link a Data Source to the form before creating the form and clicking "Create".
Screens Page: Create a New Screen

What this does is, when the form is created and the page is refreshed on the Form Designer page, the form will be pre-populated with a Choices field that is linked to the data source with its "Create/Update Row" property ticked, allowing the creation and updating of bound fields.
Form Designer: Choices field linked to Data Source and configured to Create/Update Row
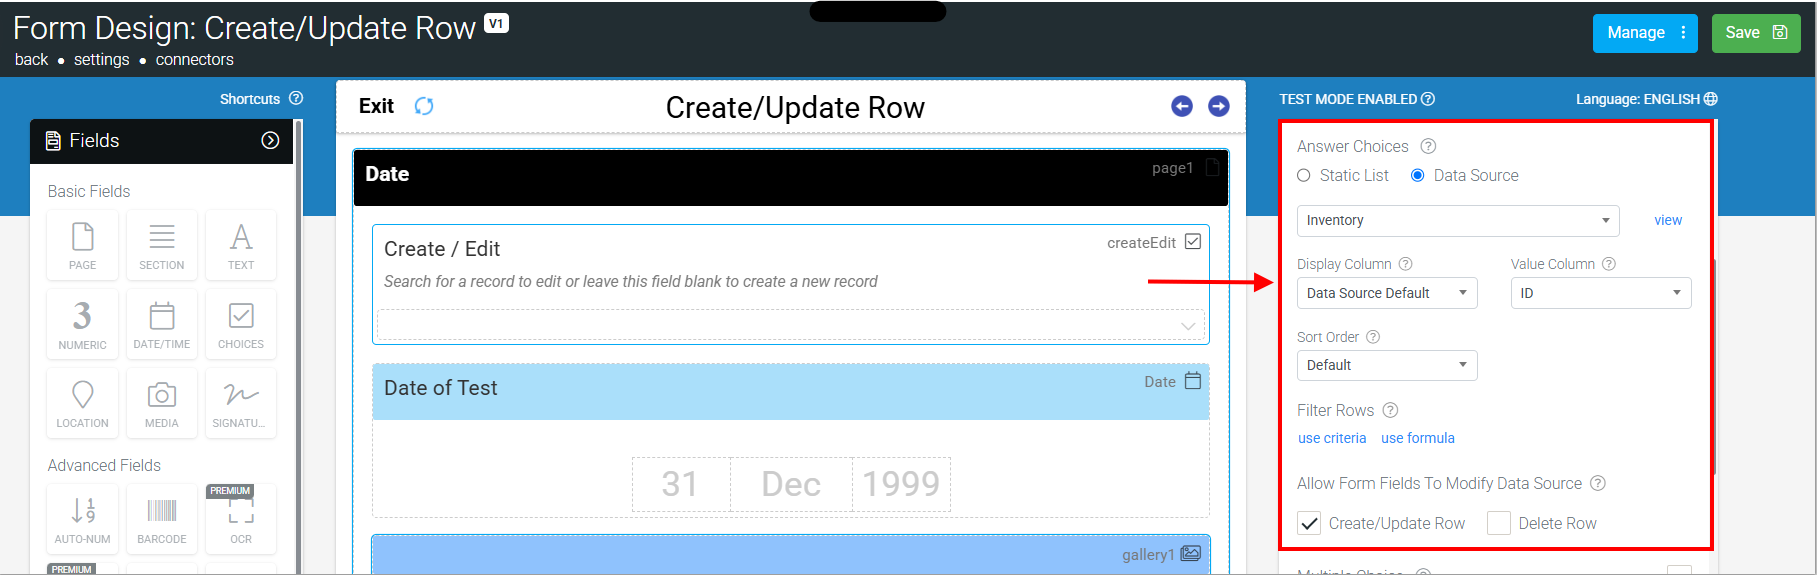
All columns from the Data Source will be added as fields, titled according to column headers from the Data Source and bound, respectively.
This binding means that the selected row's value for the given column will be set into the field, and any edits in the field will be written back to that column.
Form Designer: Text field bound to Data Source column
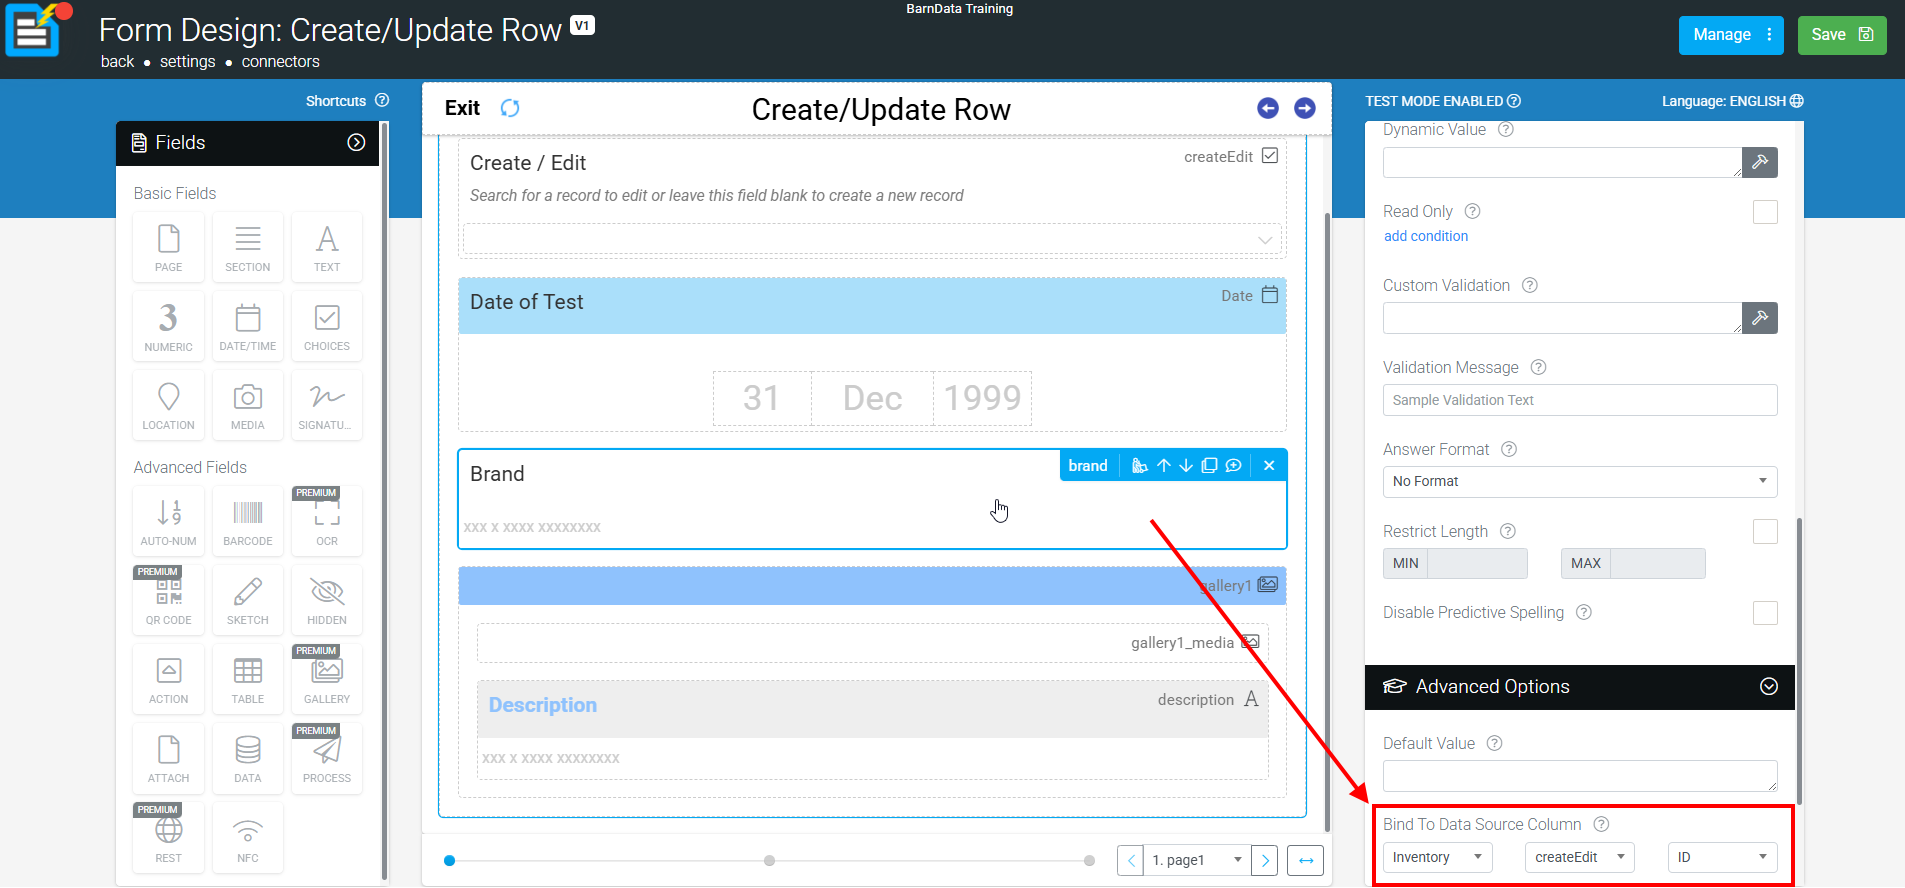
Note that pre-populated fields will only be of Text/Numeric type. If your data source contains Date/Time, Location, Image data, etc., you'll need to change these field types in the Form Designer and bind them to their respective Data Source column.
In-app, a user can now select a row from the Choices field and update all fields except the Data Source's initial/unique ID column (column 0).
If the Choices field is left blank, a new row will be created, and the platform will generate a unique ID for the data source's initial column.
However, if you want to create a new row, enter your own row ID into the data source's initial column and not use the platform's generated ID.
| It's important that column 0 has a unique value for every row in the data source. Failure to ensure that every value in column zero is unique for every row in your data source can result in duplicate records being generated when you export your data source records. |
Then, we suggest adding another field that is bound to the initial column to display only when the Choices field is blank.
Note that this field's data must be unique and not match any existing column data, as the platform will only identify rows with non-duplicate values within the unique column/column 0.
Most importantly, this method demonstrates the required steps for linking a data source to a form and binding fields to data source columns for row creating/updating/deleting.
Basically:
- Have a Choices or Hidden Data Source field in your form
- Link a Data Source to the Choices or Hidden Data Source field
- Make sure the value column of the linking field (Choices/Hidden Data Source) is set to the Data Source's unique column
- Tick the desired property - Create/Update Row OR Delete
- If Creating/Updating, add additional fields and "Bind to Data Source Column" to display data, respectively
- If Deleting, add at least one additional field and bind it to the unique column of the Data Source. Additional fields can be added and bound accordingly to display data, aiding the user in confirming the correct row is being deleted.
Creating or Updating a Row (Existing Screen)
Using a Choices field (allows for initial row selection)
- Add a Choices field
- Link to Data Source
- Tick "Update/Create Row" property
- Add additional fields and set the "Bind To Data Source Column" property accordingly to update column data.
Using a Hidden Data Source (doesn't allow for initial row selection, hence requires filtering for row selection)
- Add a Hidden Data Source field.
- Link to Data Source.
- Tick the "Update/Create Row" property.
- Add a field allowing the user to enter a value to match the data source's initial column or select from a list (via Choices) to filter the Hidden Data Source.
- Add criteria or formula to the Hidden Data Source, allowing the Hidden Data Source to filter the row based on the user's entered/selected value (This is what selects the row to be updated).
- Add additional fields and set the "Bind To Data Source Column" property accordingly to update column data.
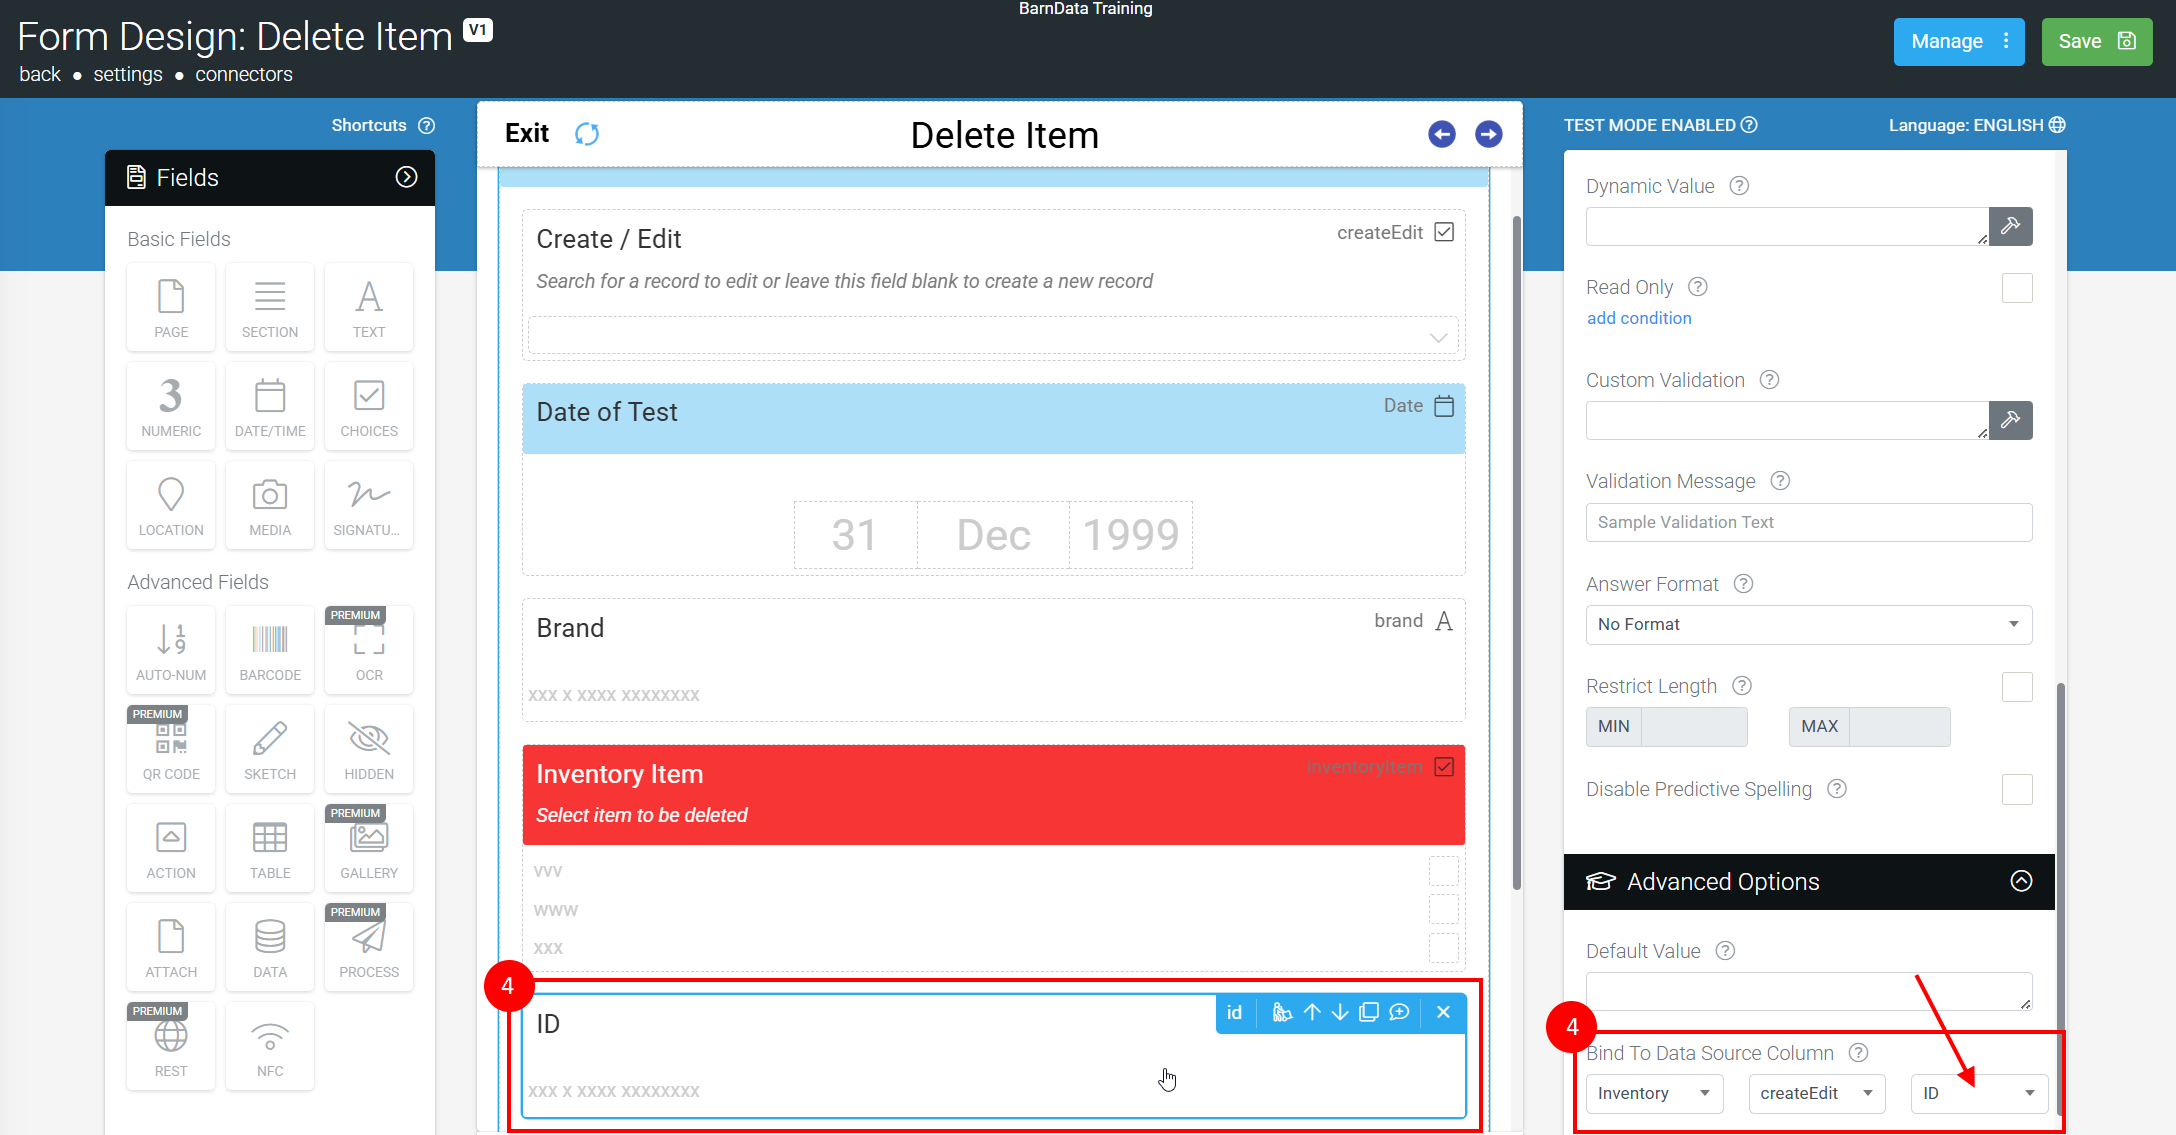
Deleting a Row (Single)
For deletion cases, you must build a separate Form that will perform row deletes - i.e., you might already have a Form that does add/edit, but to do deletes, you create a separate Form design.
This is an intentional platform approach since it means the deletion operation is always siloed to a dedicated Form design, which in turn avoids situations where a user might delete a row when they thought they were inserting/updating it.
| Important: Only a single row can be deleted per form upload by design. Hence, mulitple row deletion isn't supported in-app. |
Once you have created your dedicated "Delete" Form:
- Add a Choices field.
- Link the Choices field to your target Data Source.
- Tick the "Delete Row" property on your Choices or Hidden Data Source fields.
This instructs the Form to delete the selected row found in your Choices field when the user uploads the Form entry.
Deletion is performed based on the value in the first column of the row - remember, our system always treats the first column as the row's unique identifier.
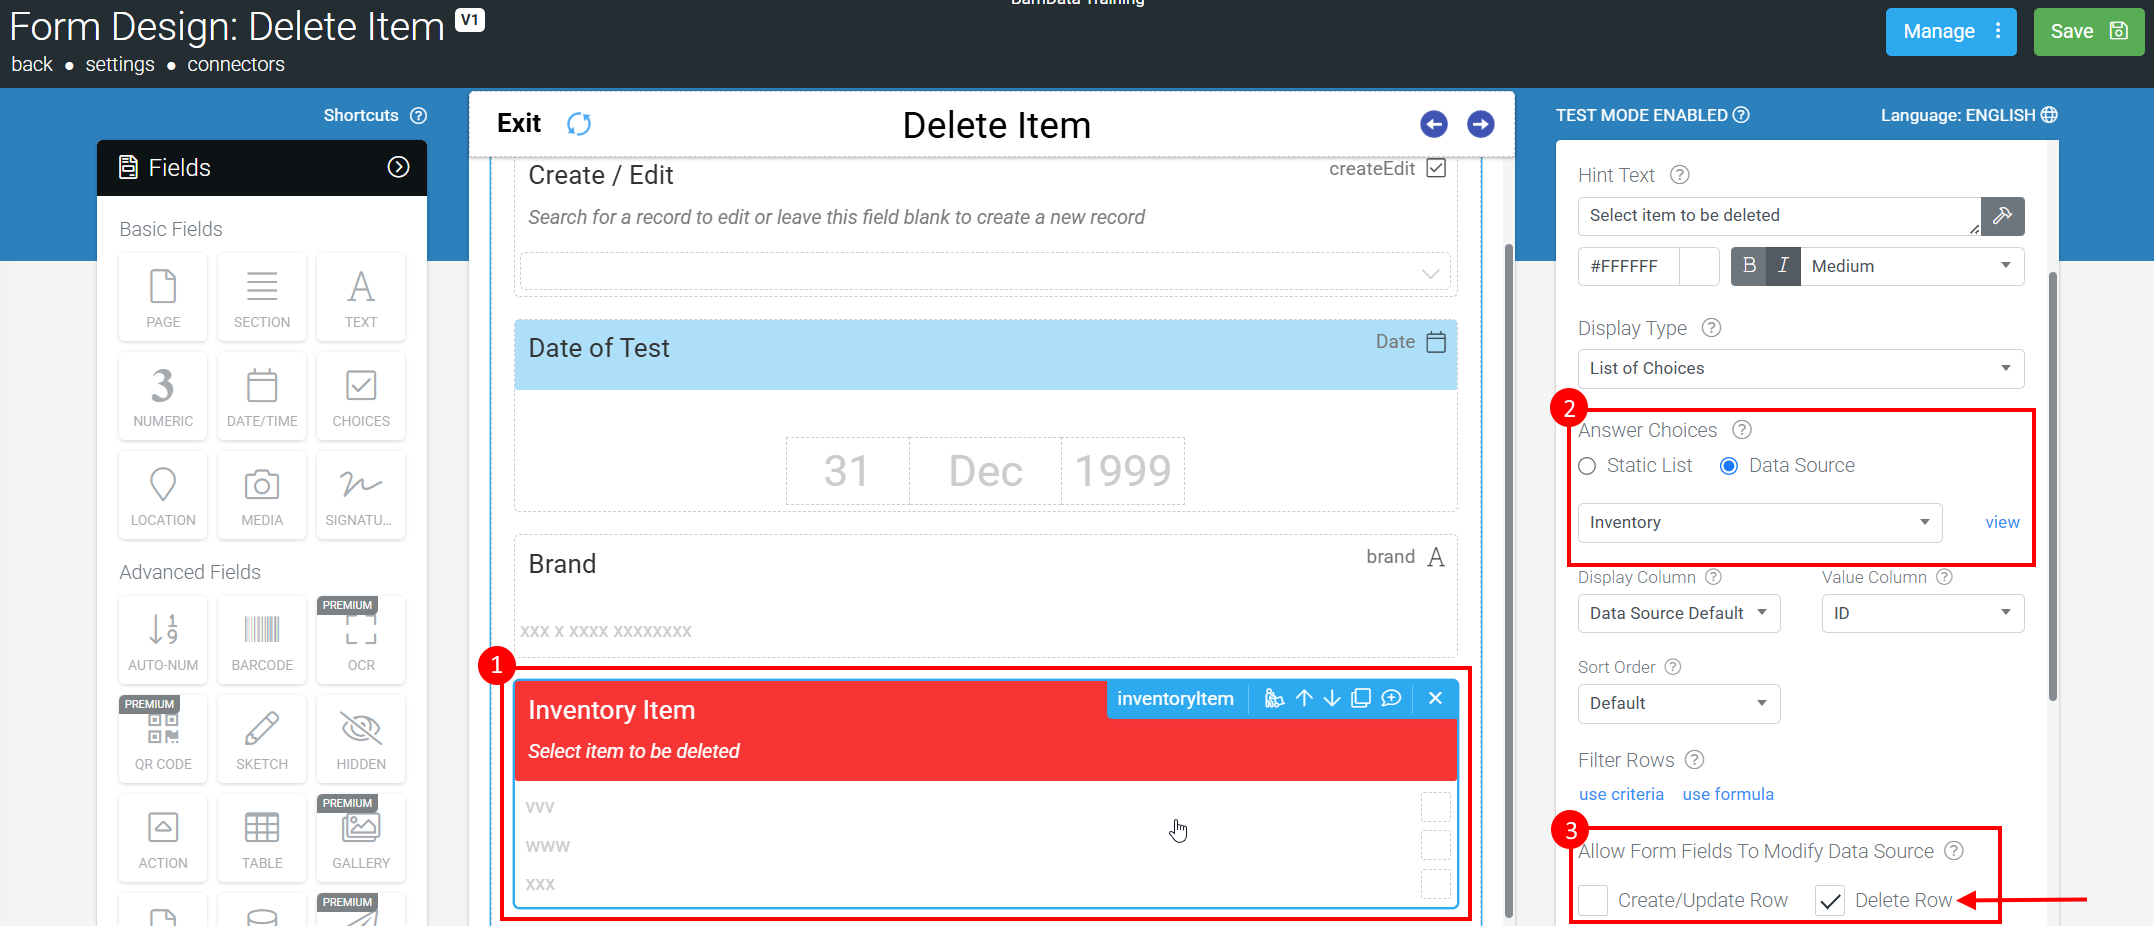
4. You then need to have at least one field that is bound to a column (i.e., Column 0) in the data source.
This is designed for the form screen to validate exactly which data source row should be deleted when a form entry gets uploaded.
You may want to add some read-only fields that use the "Bind to Data Source Column" option to display additional column information to the user, allowing them to confirm the correct row is selected for deletion.
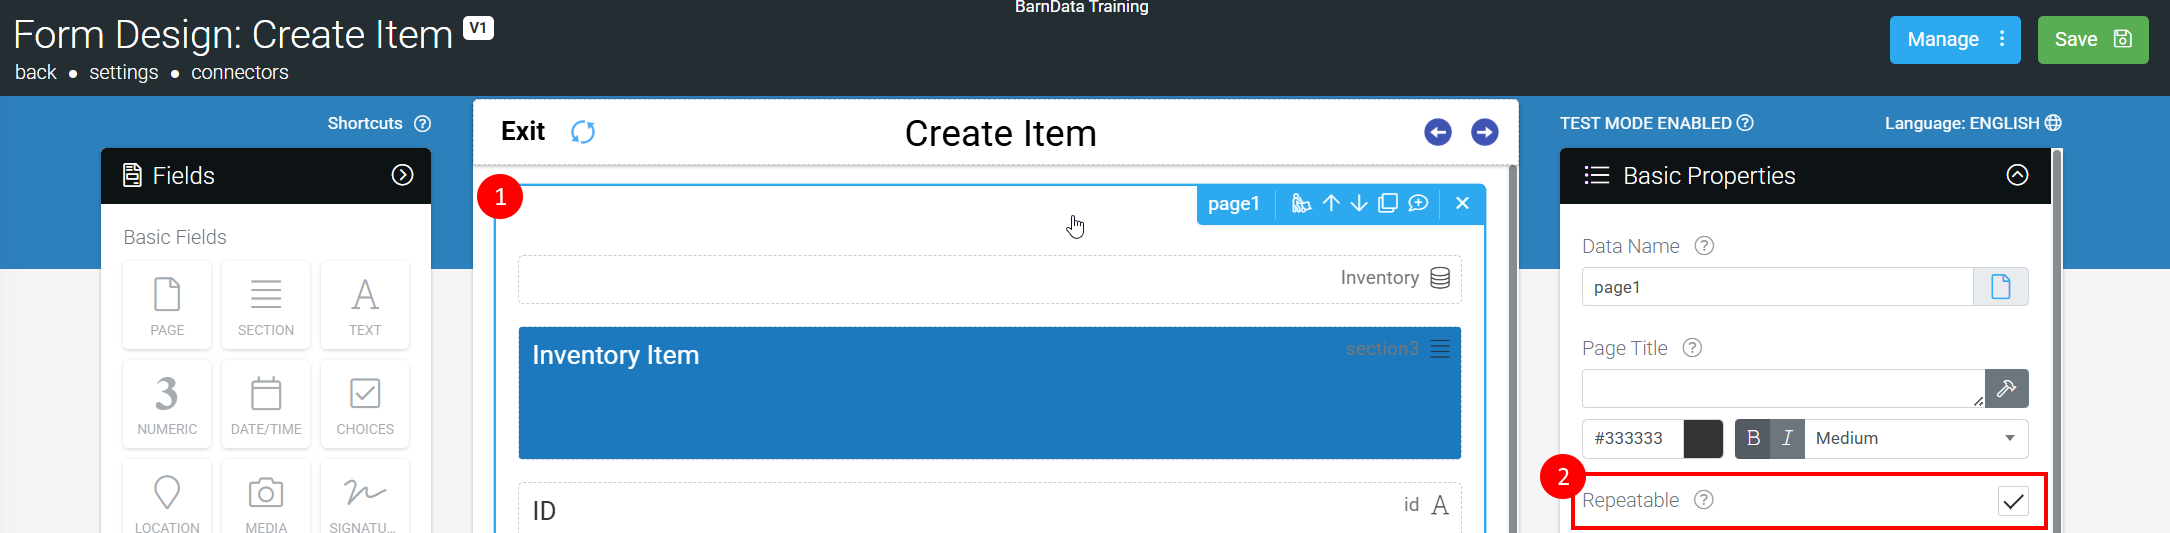
Creating or Updating Rows (Multiple)
If your Create/Update form has a repeatable page similarly set up as the example from the above "Creating or Updating a Row (New Screen)" section, then any row selection for each repeat from the Choices field will be updated or if not selected will create a new row.
Page Field: Repeatable
- Add/Select Page field.
- Tick the Page field's "Repeatable" property.
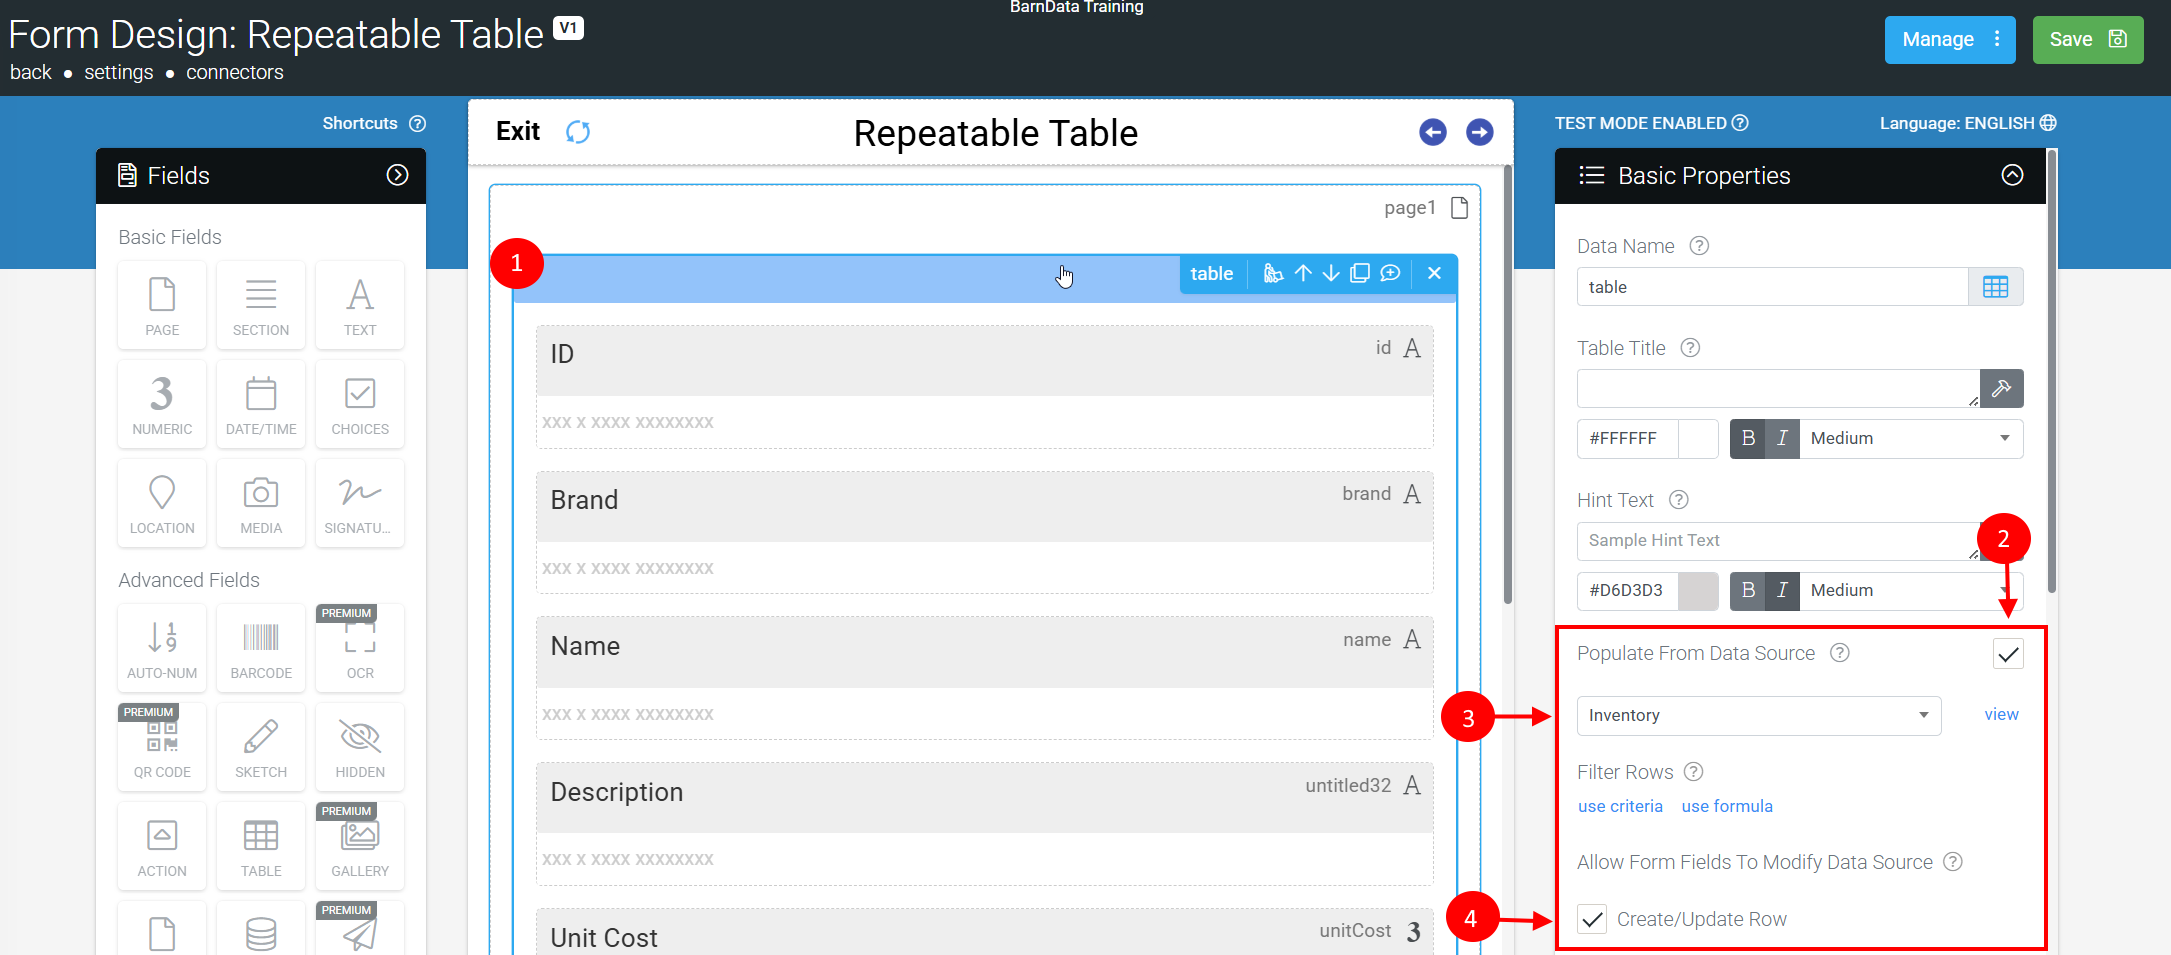
Alternatively, a Table field can be used with its "Populate From Data Source" property set, containing fields bound to desired data source columns that will not only display rows from the data source but also create new rows added to the table and update any changes made to existing rows displayed in the app.
Table Field: Populate From Data Source
- Add/Select Table field.
- Tick the "Populate From Data Source" property of the Table field.
- Link a Data Source.
- Tick "Create/Update Row".
- Add fields into the Table field and the "Bind to Data Source Column" property accordingly.
More information on our Table field type can be found here.
Tips & Tricks
Adding a Dummy Row to Display "Add New Row" Text
As a Choices field Option (instead of leaving it blank).
About the example provided in "Creating or Updating a Row (New Screen)" and the functionality of leaving the Choices field blank, i.e., no option selected, to create a new row.
If you'd prefer to have the end-user select an option of "Add New Row" for example, this is achievable by creating a dummy row in the Data Source.
Create a "dummy" row in your Data Source by adding a row with column 0 (initial column) with the value 0 (zero) and in column 1 with the text "Add New Row" for example.
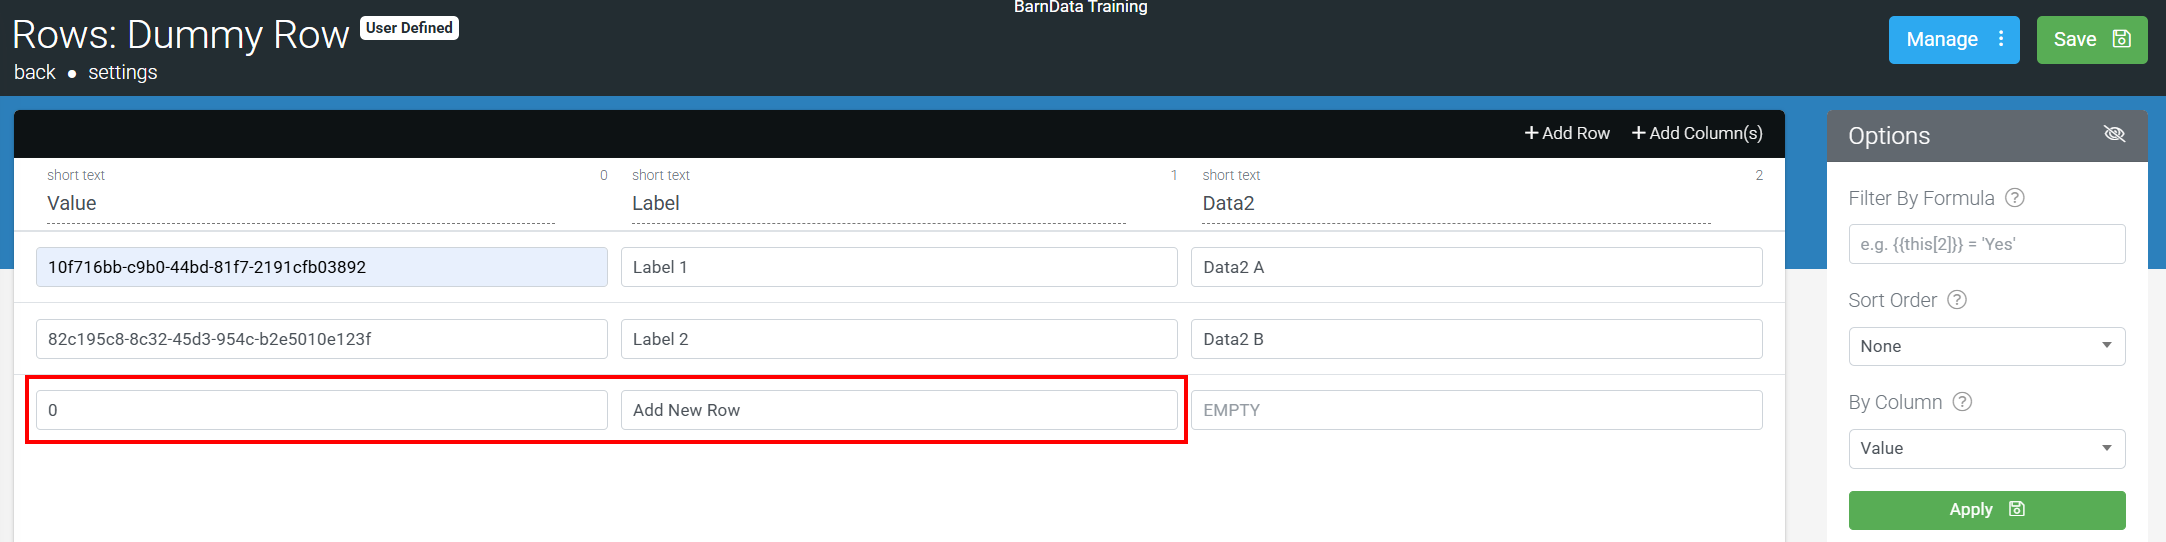
The app is coded to treat 0 value rows as being a new row, and it will auto-generate a 36-character unique key (a GUID) for the row to ensure uniqueness.
This way, the user can select this row from the list to add a new row. When a Choices field's display column is set to column 1 displaying "Add New Row" the value column is set to column 0 when linked to Data Source.
Setting the displayable title column of this dummy row will make the purpose of the dummy row clear to the user.
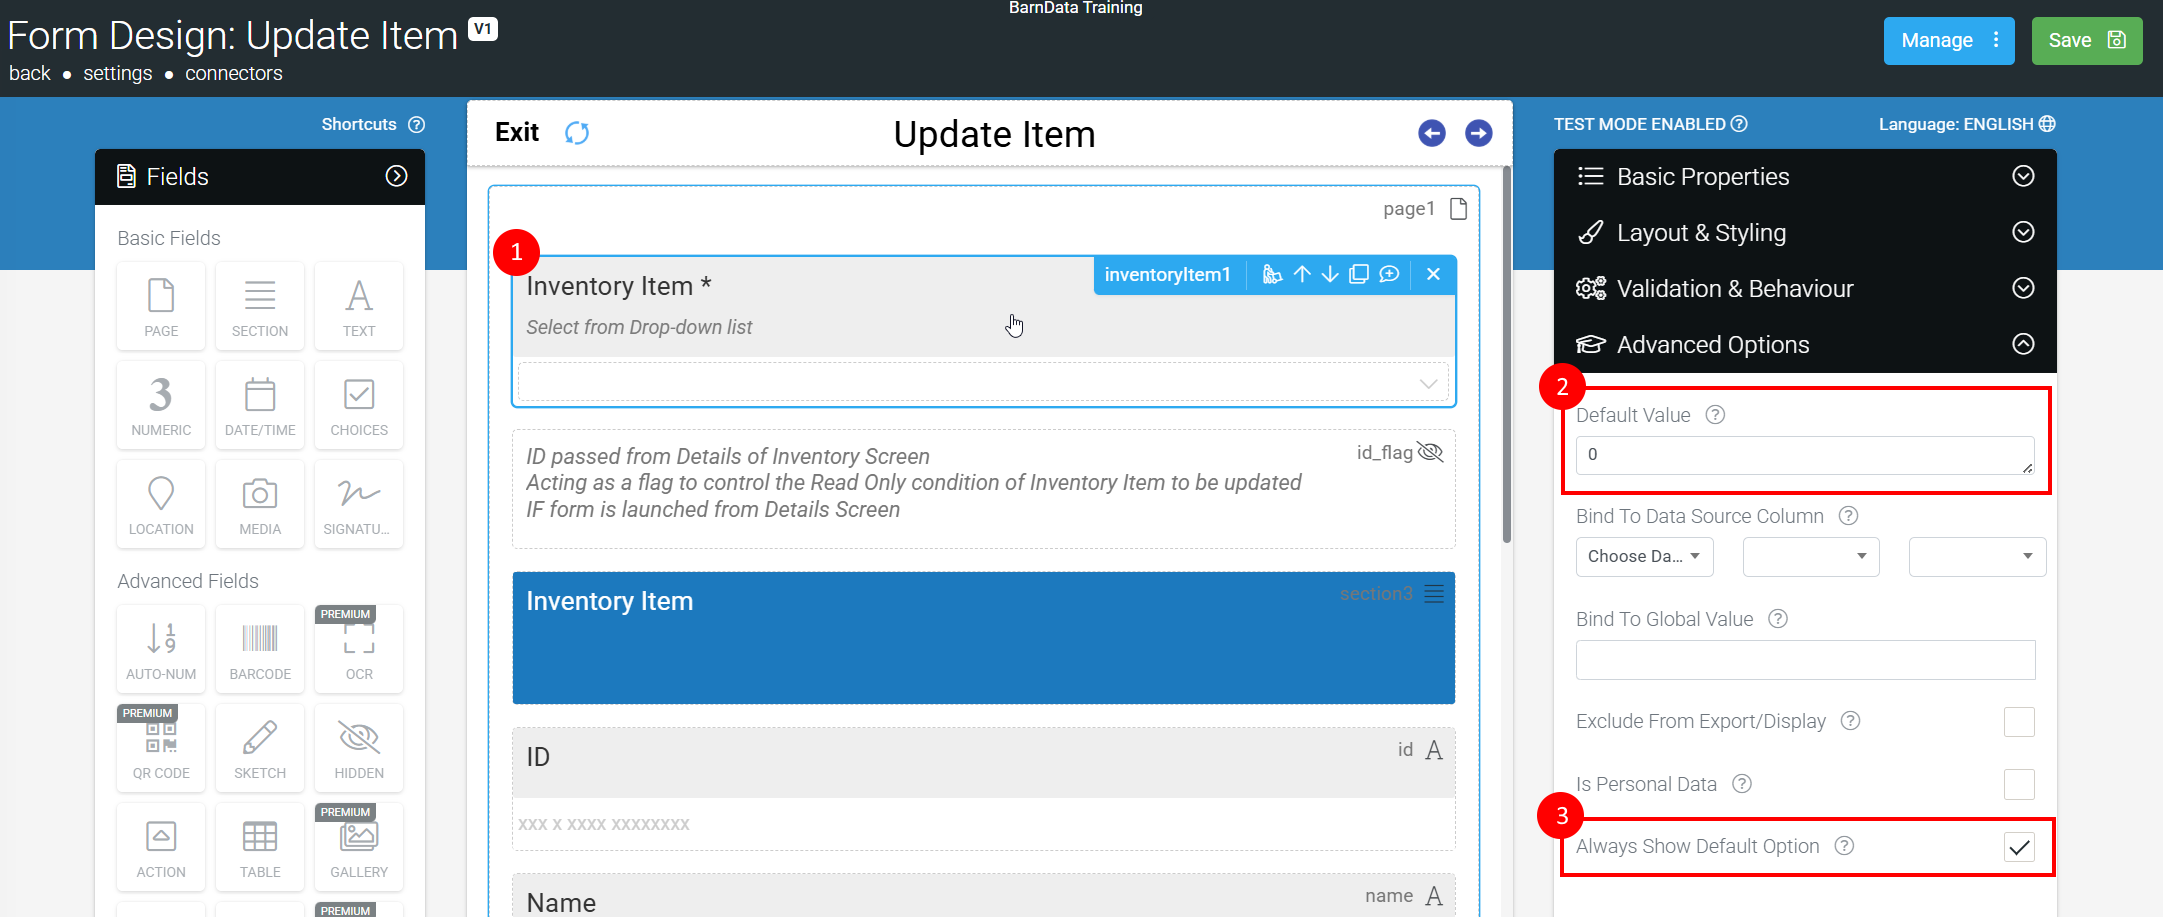
If you want the dummy row to always be visible as an option on the Choices field, then set the Default Value property to 0 and tick on the "Always Show Default Option" property.
Once you have implemented the above, test out your Form to see the results.
Try selecting and editing an existing row and creating a new one.
Once the form has been completed and uploaded, the Data Source will be automatically updated with the new row/update row, both on-device and then on the central data source on the web platform.
Adding a dummy row also becomes handy when you need to add or update a row based on a condition conditionally. You can then use a filter formula that specifies the dummy row for a new or existing row to update.
Hosted GET Considerations When Creating New Rows
If the Data Source you are updating is supplied to the app via a Hosted GET, then read on to review the integration considerations involved.
Here's what happens when a new row is created on the app:
- A new record gets created with the Form Entry ID as the row's identifier in the local app-side Data Source copy.
This is done to give a consistent user experience, in that the user can see the new row they created any Data Source listings immediately after completing their creation Form entry.
- When a Hosted GET is involved, we expect your system to receive the new Form Entry (e.g., via a REST connector on the Form), process it, and check whether the Choices/Data Source field value matches the Form Entry ID.
If your service finds this, then your system knows that this entry created a new row, and you can process it accordingly, creating a matching new row on your system with a new system-assigned ID.
- If your Hosted GET does a full replace of rows on every call from the app - i.e., using the Rows property on your responses - then you're done, nothing more to do :)
The next Hosted GET sync will clear all existing app rows (including the one stored locally with the Form Entry ID) and replace them with your system's rows (including your new system-assigned row).
OTHERWISE
- If you are making incremental updates on the Hosted GET - i.e., sending NewRows and DeletedRows back on your responses - then there is still the matter of removing the local app-created new row identified by the Form Entry ID and adding your new system-assigned row.
So when receiving the Form Entry on your web service, you will need to track the user's device ID and Form Entry ID for use by your Hosted GET service since you need to replace the app's local new row with your system assigned new row.
On the next app sync from the user's device (identified by their device ID), your Hosted GET should send a DeletedRows value containing the stored Form entry ID and a NewRows value containing the new system-assigned row values.
This will cause the app to delete the local entry id-based row and add the new system-assigned row.